 Save
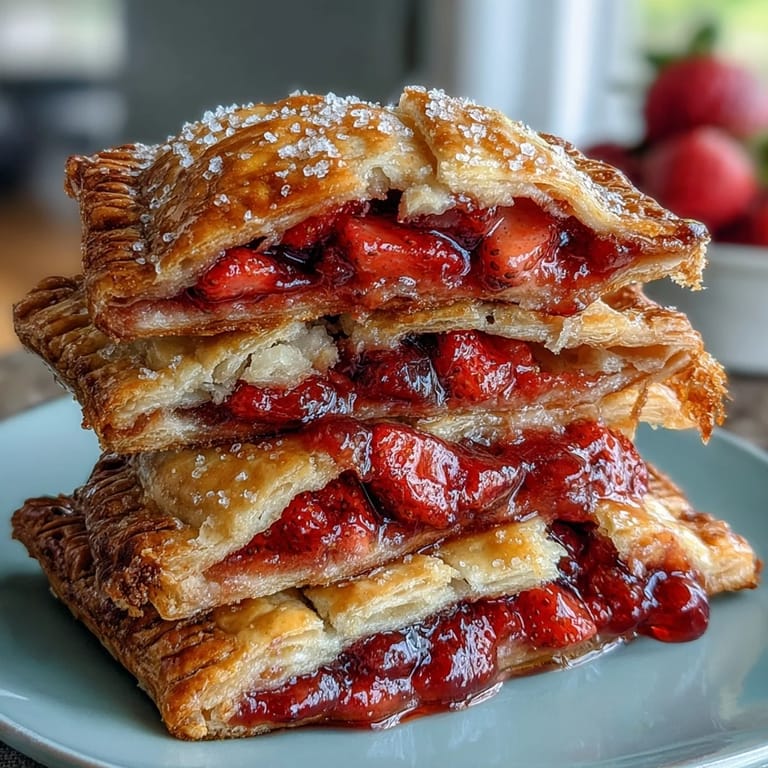
Save Last summer, my friend Sarah showed up at our lake house with a basket of these strawberry hand pies still warm from her car, and honestly, the smell alone made the whole afternoon feel like a celebration. I'd never seen lattice work on something so portable before—it felt fancy but approachable, like she'd cracked some secret code about desserts that travel well. One bite and I understood why she'd spent her morning making them instead of sleeping in, and I knew I had to learn the recipe myself.
I made these the first time for a surprise birthday picnic in the park, and watching people's faces when they realized these delicate little pies were meant to be held in one hand—and that the filling wouldn't immediately drip everywhere—was worth every minute spent on the lattice work. My sister actually asked for the recipe before she'd even finished hers, which felt like the highest compliment possible.
Ingredients
- All-purpose flour: The foundation of your crust, and using the right amount by weight rather than scooping ensures your dough won't be too dry or tough.
- Cold unsalted butter: This is where the flakiness comes from—those tiny cold butter pieces create steam pockets as they bake, so keep it actually cold and cut it into cubes rather than slicing.
- Ice water: It sounds fussy but trust it; cold water keeps the butter from melting into the dough before baking, which is the whole point of making pastry from scratch.
- Fresh strawberries: The sweetness varies wildly depending on the season and where you buy them, so taste your filling before assembling and adjust sugar if needed.
- Cornstarch: This prevents the filling from turning into a soupy mess that leaks everywhere during baking—a lesson I learned the hard way on my first try.
- Lemon juice and vanilla: These brighten the berry flavor instead of letting it get flat and one-dimensional, which is the difference between a good pie and one that tastes like summer itself.
- Egg wash: This creates that gorgeous golden shine and helps the coarse sugar stick, making the pies look like they're worth the effort.
Tired of Takeout? 🥡
Get 10 meals you can make faster than delivery arrives. Seriously.
One email. No spam. Unsubscribe anytime.
Instructions
- Prepare the dough with cold hands and patience:
- Whisk your flour, sugar, and salt together first, then add your cold butter cubes and work them in with a pastry blender or fork until everything looks like coarse bread crumbs—you should still see tiny pea-sized pieces of butter. This texture is exactly what you're after, and it's the moment where rushing leads to disappointment.
- Bring the dough together gently:
- Add your ice water one tablespoon at a time, mixing just until the dough comes together without crumbling apart—overworking it at this stage makes tough pies that nobody enjoys. Divide into two disks, wrap each in plastic, and let them chill for at least an hour while you do literally anything else.
- Make your filling sing:
- Toss your diced strawberries with sugar, cornstarch, lemon juice, vanilla, and salt, then let them sit for about ten minutes so they release their juices and the flavors marry together. The filling will look loose at first, but that's exactly right—the cornstarch will thicken everything as it bakes.
- Roll and cut with confidence:
- On a lightly floured surface, roll out your first dough disk to about 1/8 inch thick—think thin enough to be delicate but thick enough to hold filling without tearing. Cut out eight rectangles or circles about 3 by 4 inches, then place them on a parchment-lined baking sheet.
- Fill with restraint:
- Spoon 2 to 3 tablespoons of strawberry filling into the center of each piece, leaving a border all around so the edges can seal properly without leaking. Too much filling is the enemy of a well-sealed pie.
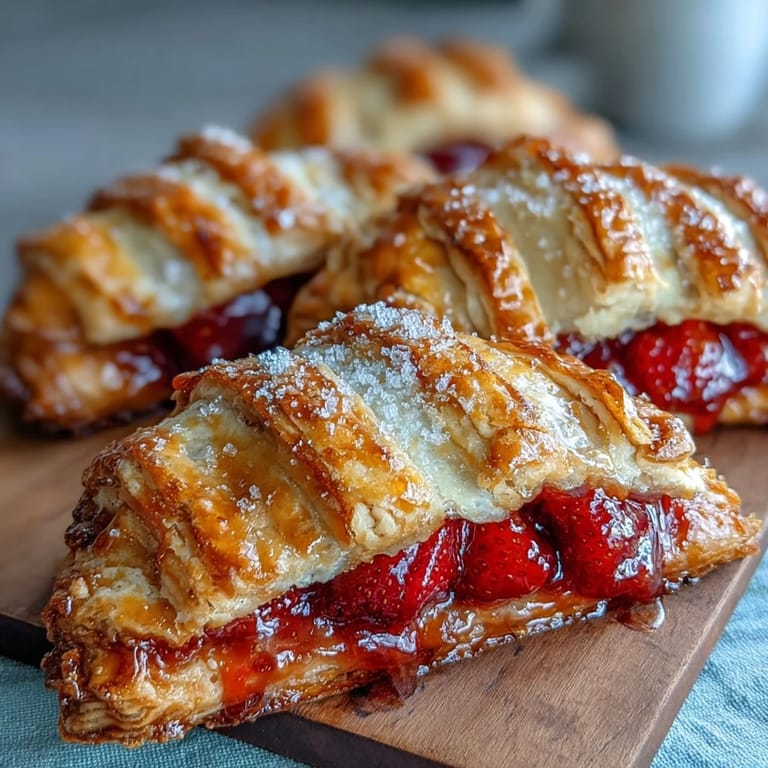
- Weave your lattice tops:
- Roll out your second dough disk, cut matching shapes, and then cut each piece into six thin strips with a sharp knife or pastry wheel—they don't need to be perfectly uniform, just roughly the same width. Weave them over the filled bottoms in an over-under pattern, which honestly takes longer to describe than to actually do.
- Seal and finish with intention:
- Press the lattice edges down where they meet the bottom crust, then crimp the entire border with a fork to seal everything shut and make it look intentional. Brush the whole thing with beaten egg and sprinkle generously with coarse sugar, which will sparkle when they come out of the oven.
- Bake until golden and bubbly:
- Pop them into a 400°F oven for 22 to 25 minutes until the crust is deeply golden and you can see the filling bubbling slightly at the edges. The smell at this point is almost better than eating them, but not quite.
- Cool properly before transporting:
- Let them rest on a wire rack for at least 15 minutes so the filling sets slightly and won't slide around when you move them. They're still warm and wonderful at this point, and that's honestly the perfect time to eat one.
 Save
Save There's something almost magical about making these with someone else in the kitchen—my neighbor came over to learn, and by the time we were halfway through the lattice weaving, we were laughing at how meditative it became. These pies ended up being the thing we made together every summer after that, until she moved away, which is maybe the sweetest reason a recipe can stick around.
The Secret to Perfect Pastry
The real magic isn't in fancy techniques or expensive ingredients—it's in understanding that warm butter and warm hands are the enemies of flaky crust. I learned this by ruining at least three batches before I finally started keeping everything cold, even wearing slightly cool hands under cold running water before touching the dough. Your pastry blender matters less than your patience, and taking your time at every stage is what separates good pies from ones that make people close their eyes when they bite into them.
Variations That Still Feel Special
Once you understand the basic structure, you can play with the filling in ways that keep things interesting without getting complicated. I've made these with half strawberries and half blueberries when the farmers market had both looking perfect, and I've even tried a version with a tiny touch of cardamom that tasted like spring felt. The vanilla extract can be swapped for almond extract if you want something slightly different, and a pinch of fresh mint stirred into the filling right before assembly adds a brightness that surprises people in the best way.
Making Them Ahead and Storing With Care
These pies are actually better when you make them the morning of your picnic rather than the night before, since the crust stays crispier that way and the filling has enough time to set without getting soggy. Store them in an airtight container at room temperature, and they'll hold their own for about six hours before starting to soften—which means they're perfect for a lunch outing but might get a little limp by dinner. If you're really planning ahead, you can freeze the assembled but unbaked pies for up to a month, then bake them straight from frozen, adding just a few extra minutes to the baking time.
- Serve them with whipped cream or vanilla ice cream if you want to be really generous with yourself.
- A tiny squeeze of fresh lemon juice right before serving brightens the strawberry flavor in a way that feels almost elegant.
- These are the kind of dessert that somehow tastes even better when eaten outside, surrounded by people you actually like.
 Save
Save There's something about putting something you made with your own hands into someone else's hands that changes how they taste it—these pies are more than just dessert when they come from your kitchen. Make them when you have time to enjoy the process, and they'll taste like that care in every bite.
Your Questions Answered
- → What makes the crust flaky?
Cold butter cut into flour forms small fat pockets that create a flaky texture when baked.
- → Can I use other berries for the filling?
Yes, blueberries or raspberries can be swapped for half or all of the strawberries for varied flavors.
- → How should I store the hand pies?
Keep them in an airtight container at room temperature for up to two days or refrigerate for longer freshness.
- → What is the purpose of the lattice topping?
The lattice allows steam to escape during baking and adds an attractive, crisp finish.
- → Can I prepare the dough ahead of time?
Yes, chilling the dough for at least an hour helps with workability and texture; dough can be prepared the day before.