 Save
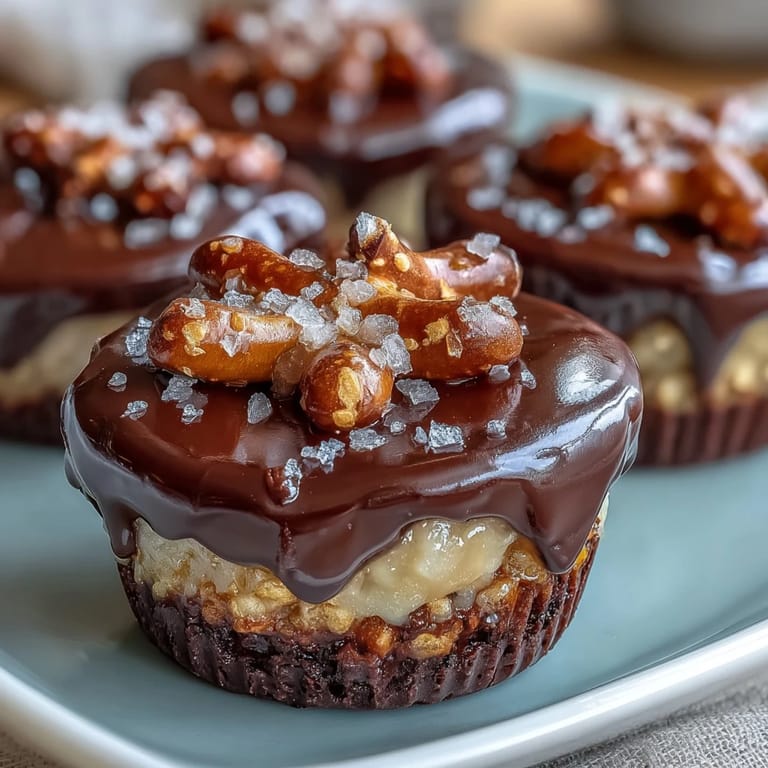
Save My coworker brought these to the office one Tuesday, and I couldn't stop thinking about them for weeks. The moment that chocolate shell cracked between my teeth, releasing that salty pretzel crunch underneath the creamy peanut butter, I knew I had to learn how to make them myself. What started as casual curiosity turned into an afternoon project that left my kitchen smelling like melted chocolate and tasting like pure nostalgia. These homemade versions beat anything store-bought because you control every layer, every texture, every flavor balance. Now they're my go-to when I need something that feels fancy but comes together in under an hour.
I made a batch for my niece's birthday party last summer, and watching her bit into one with that surprised expression when the pretzel crunch happened was worth every minute of prep. Her friends went back for seconds and thirds, and suddenly I was getting requests from their parents too. That afternoon taught me that sometimes the simplest recipes become the ones people remember most fondly.
Ingredients
- Mini salted pretzels, crushed (1 cup, about 60 g): Don't use pretzel sticks whole—crushing them means they stay embedded in your base and deliver that crunch in every bite, plus they press down better with melted butter.
- Unsalted butter, melted (2 tbsp): Melted butter binds the pretzels into a foundation that holds firm when chilled, giving you something to build on that won't crumble.
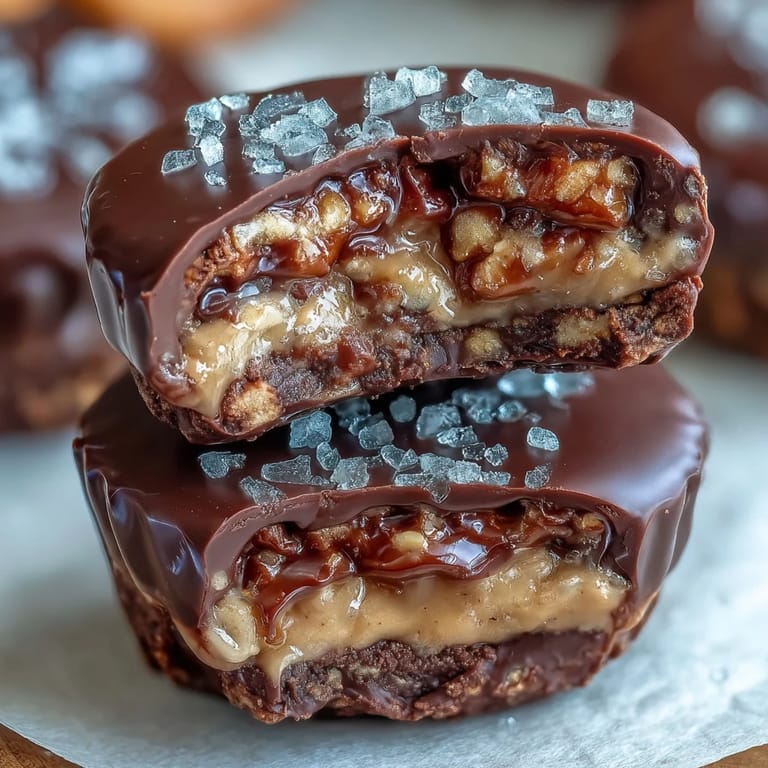
- Creamy peanut butter (3/4 cup, 180 g): Use the kind without added oils if possible, as it blends smoother and feels more luxurious without separating.
- Powdered sugar (1/4 cup, 30 g): This sweetens the peanut butter layer without making it grainy, and it keeps the texture silky when combined.
- Vanilla extract (1/4 tsp): A whisper of vanilla lifts the whole peanut butter experience, making it taste less one-note and more sophisticated.
- Salt (pinch): Even though your pretzels are already salty, this pinch in the peanut butter layer balances sweetness and makes everything taste more intentional.
- Semi-sweet chocolate chips (1 1/4 cups, 210 g): Semi-sweet gives you that classic chocolate flavor without being too dark or too sweet, making it the perfect neutral partner for salty and creamy layers.
- Coconut oil or unsalted butter (1 tbsp): This thins the chocolate just enough to spread smoothly without making it taste diluted, and it helps it set with a nice snap.
Tired of Takeout? 🥡
Get 10 meals you can make faster than delivery arrives. Seriously.
One email. No spam. Unsubscribe anytime.
Instructions
- Set up your workspace:
- Line your muffin tin with paper liners—this step feels small but it saves you from the frustration of peeling chocolate-covered paper later. Having everything in place means you can move through assembly without stopping to search for tools.
- Build the pretzel foundation:
- Crush your pretzels into uneven pieces—you want some crunch, not pretzel dust. Mix them with melted butter until every piece glistens, then press about a tablespoon into each cup firmly enough that it holds together but gently enough that it doesn't compress into a brick.
- Create the peanut butter layer:
- Blend your peanut butter with powdered sugar, vanilla, and salt until smooth and spreadable. A quarter cup of peanut butter per cup might sound small, but it's the perfect amount—too much and it overwhelms everything, too little and you lose that creamy center that makes these special.
- Melt your chocolate carefully:
- Don't rush the melting process—thirty-second bursts in the microwave with stirring in between keep your chocolate glossy and prevent it from seizing into a grainy mess. Adding coconut oil makes it flow like a dream across the peanut butter layer.
- Finish with chocolate:
- Spoon the warm chocolate over each cup and use the back of your spoon to gently smooth it into an even coating. Work while the chocolate is still warm enough to spread but cool enough not to melt into the peanut butter layer beneath.
- Chill until set:
- Thirty minutes in the refrigerator is your minimum—this is when everything transforms from separate layers into one cohesive whole. You'll know they're ready when the chocolate has a slight snap to it rather than feeling soft.
 Save
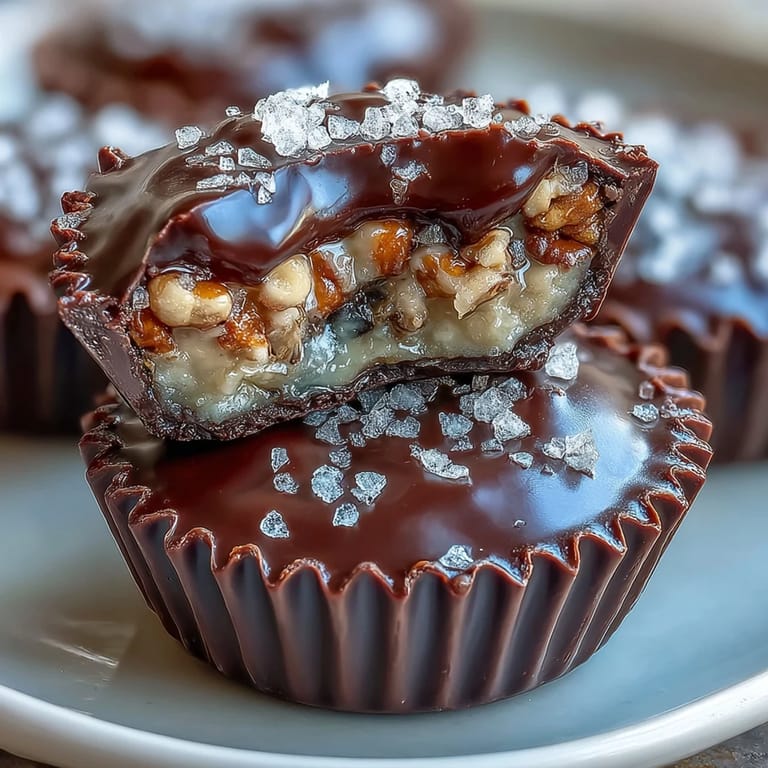
Save There was a moment, standing in my kitchen on a quiet Sunday morning, when I pulled the first batch from the refrigerator and peeled back a paper liner to reveal that perfect three-layer cross-section. The colors, the textures, the intentional layers—it felt like edible proof that something simple could still be extraordinary. That's when these cups stopped being a recipe and became something I make for people I care about.
The Sweet and Salty Pairing That Works
The magic of these cups lives in the contrast between layers, and understanding why that works will make you appreciate each bite more. Salty pretzels wake up your taste buds and prevent chocolate fatigue, creamy peanut butter provides richness that satisfies, and sweet chocolate brings everything into harmony. It's not accidental—it's the reason this flavor combination shows up in candy aisles everywhere, except yours taste better because you made them.
Storage and Make-Ahead Magic
These cups keep beautifully in an airtight container in the refrigerator for up to two weeks, which means you can make them days ahead without stress. I've learned that they actually taste better after a day or two when the flavors have had time to marry together and the texture becomes even more satisfying. They're excellent candidates for the freezer too if you want to get even further ahead, thawing for about ten minutes before serving.
Variations and Customization Possibilities
Once you've mastered the basic version, the fun part begins—you get to play. I've experimented with dark chocolate for sophistication, drizzled a little more peanut butter on top before the chocolate sets, and sprinkled crushed pretzels across the wet chocolate layer for texture overload. The foundation is so solid that variations feel like creative expression rather than risky experiments.
- Try dark chocolate if you want something richer and less sweet, or milk chocolate if your family prefers extra sweetness.
- For extra crunch, scatter a few crushed pretzels across the melted chocolate before it sets.
- Swap half the peanut butter with almond butter if you're in the mood for something slightly different.
 Save
Save These homemade peanut butter cups remind me that the best things in life don't need to be complicated—just intentional. Make them once, and you'll understand why they belong in your regular rotation.
Your Questions Answered
- → How do I achieve the perfect crunch in the base?
Use crushed mini salted pretzels mixed with melted butter, then press firmly into muffin liners to form a compact base.
- → What alternatives can I use for the chocolate topping?
Semi-sweet chocolate is recommended, but you can substitute with dark or milk chocolate for varying richness and sweetness.
- → Can these cups be made gluten-free?
Yes, by using gluten-free pretzels instead of regular ones, you can easily adapt the cups to gluten-free diets.
- → What is the best way to melt the chocolate topping evenly?
Microwave chocolate chips with coconut oil in short intervals, stirring frequently to ensure smooth melting without burning.
- → How should these cups be stored to maintain freshness?
Keep them chilled in an airtight container within the refrigerator to preserve texture and flavor for several days.