 Save
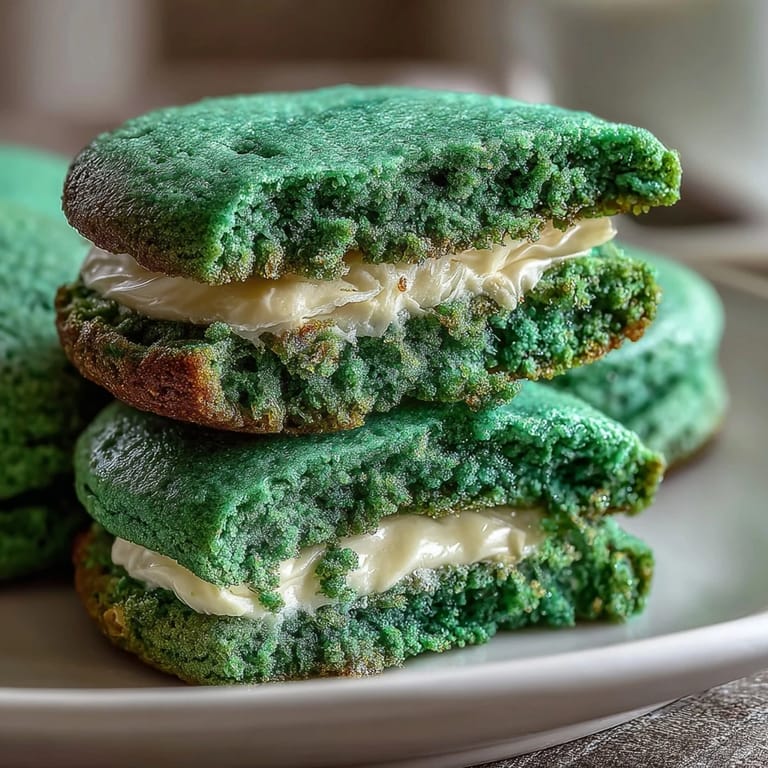
Save Last March, my neighbor knocked on the door with green-frosted cookies that looked like they'd been dipped in fairy dust, and I realized I'd been overthinking festive baking for years. She showed me her trick that afternoon—soft, buttery cookies coated in sparkly sugar before baking, then sandwiched with clouds of vanilla frosting—and suddenly St. Patrick's Day desserts clicked into place. The whole process took less time than I expected, and watching the cookies turn golden while that brilliant green held steady felt like quiet magic happening in my own oven.
I brought these to an office potluck and watched my coworker take a bite, pause, and immediately ask for the recipe—that moment of genuine surprise when someone realizes homemade cookies don't have to be complicated told me everything I needed to know about this sandwich cookie formula. What started as me trying to impress had become something everyone could actually make themselves, and that felt better than any compliment about technique.
Ingredients
- All-purpose flour (2 1/2 cups): This is your structure, and measuring by weight gives you consistent results every single time.
- Baking powder (1/2 tsp): Just enough lift to keep cookies tender without making them cake-like.
- Salt (1/4 tsp): A pinch that makes everything taste more like itself, especially important when your dough is this sweet.
- Unsalted butter (1 cup for dough): Softened means it creams properly and traps air, giving you that light texture.
- Granulated sugar (1 cup): The sweetness foundation that works with butter to create a tender crumb.
- Large egg: Binding agent that also adds moisture without overwhelming the dough.
- Vanilla extract (2 tsp): Use pure vanilla—it's the backbone of flavor here, especially since green cookies can taste one-dimensional without it.
- Almond extract (1/2 tsp, optional): This adds an unexpected depth that makes people ask what your secret ingredient is.
- Green gel food coloring: Gel formulas stay concentrated and don't thin your dough like liquid colors do, which I learned the hard way with watery batches.
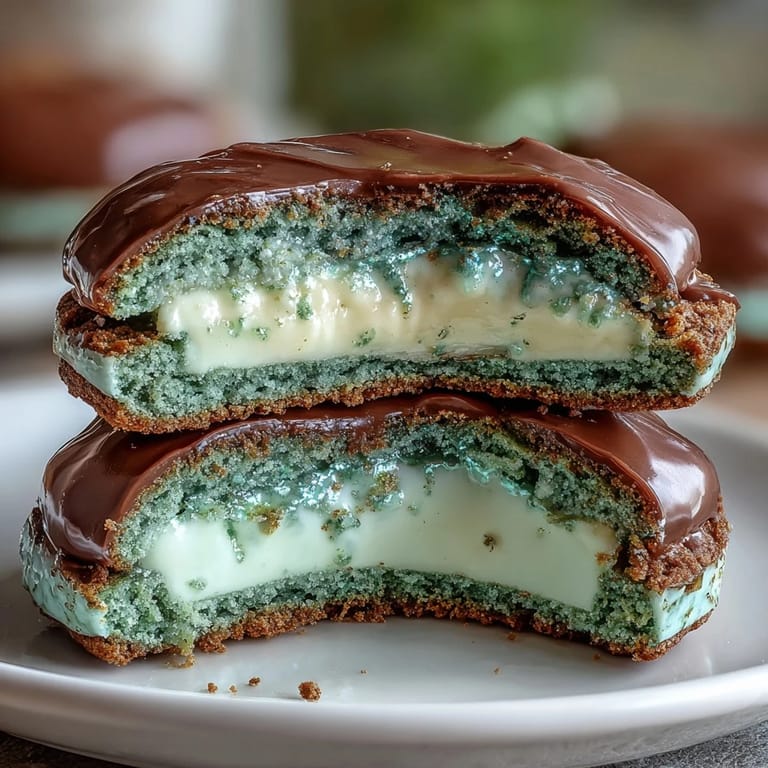
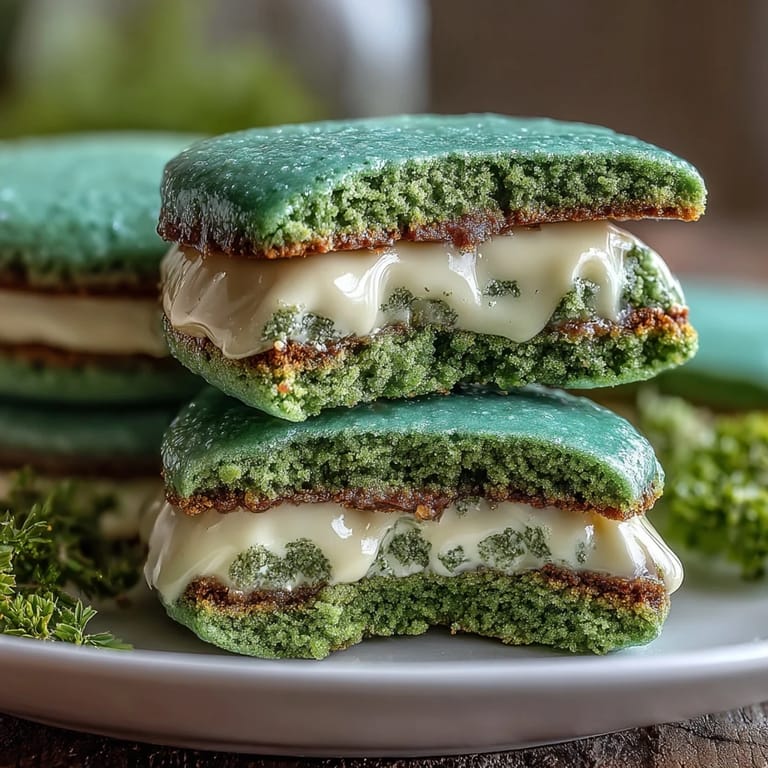
- Green sparkling sugar (1/2 cup): This coats the cookies before baking and fuses slightly into the surface, creating that jeweled look.
- Unsalted butter for frosting (1/2 cup): Softened butter whips into frosting that's cloud-like and easy to work with.
- Powdered sugar (1 3/4 cups, sifted): Sifting removes lumps and prevents grainy frosting—worth the extra thirty seconds.
- Milk (1 1/2 tbsp): Adjusts frosting consistency; start with less if you prefer stiffer frosting for piping.
- Vanilla extract (1 tsp): Echoes the cookie flavor and keeps frosting from tasting one-dimensional.
- Salt (pinch): Balances sweetness in the frosting itself.
Tired of Takeout? 🥡
Get 10 meals you can make faster than delivery arrives. Seriously.
One email. No spam. Unsubscribe anytime.
Instructions
- Prepare your workspace:
- Heat your oven to 350°F and line two baking sheets with parchment paper—this prevents sticking and gives you a clean surface to work on. Having everything ready before you start means you won't scramble partway through.
- Combine dry ingredients:
- Whisk flour, baking powder, and salt together in a medium bowl and set it aside. This distributes the leavening evenly so you don't end up with pockets of dense dough.
- Cream butter and sugar:
- Beat softened butter and granulated sugar in a large bowl for about two to three minutes until the mixture looks pale and fluffy, almost like thick frosting itself. You'll notice the texture change as air gets incorporated—this is what makes your cookies tender instead of dense.
- Add egg and extracts:
- Beat in the egg, vanilla extract, and almond extract if you're using it, scraping the bowl occasionally to make sure everything combines. The mixture should look smooth and emulsified.
- Achieve your green:
- Add gel food coloring a few drops at a time, mixing well after each addition until you reach the green shade you want. Gel coloring is concentrated, so a little goes surprisingly far—you can always add more, but you can't take it out.
- Bring dough together:
- Gradually add the dry ingredients to the wet mixture, stirring until a soft dough forms and no streaks of flour remain visible. Don't overmix or you'll develop gluten and end up with tough cookies.
- Coat and shape:
- Scoop tablespoon-sized portions of dough and roll each one into a smooth ball between your palms, then immediately press it into a small bowl or plate of green sparkling sugar to coat all sides. Place the coated balls about two inches apart on your prepared baking sheets.
- Flatten gently:
- Use your palm or the bottom of a glass to gently flatten each ball into a disc about 1/4-inch thick—too thin and they'll be crispy, too thick and the centers won't bake through. Gentle pressure is key; you're not pressing the air out, just creating an even thickness.
- Bake to soft centers:
- Bake for nine to eleven minutes, watching until the edges look set and slightly golden but the centers still look slightly underdone. They'll continue cooking on the hot pan, so resist the urge to bake them until they look completely done or you'll end up with crunchy cookies.
- Cool completely:
- Transfer cookies to a wire rack and let them cool fully before filling—warm cookies will melt your frosting. This patience step is non-negotiable if you want sandwich cookies instead of frosting soup.
- Make frosting:
- Beat softened butter until creamy in a medium bowl, then add sifted powdered sugar, milk, vanilla, and a pinch of salt, beating until the mixture is smooth and fluffy. If it's too stiff, add milk a teaspoon at a time; too soft, add more powdered sugar.
- Assemble sandwiches:
- Spread or pipe a generous layer of frosting onto the flat side of half your cookies, then top each with another cookie, flat-side down, to create sandwiches. If you want extra sparkle, roll the exposed frosting edges in additional sparkling sugar before the frosting sets.
 Save
Save My daughter helped me roll the dough balls one afternoon, and she got so focused on getting them perfectly round that she forgot to rush, forgot that baking usually felt like a task instead of a moment we were sharing. These cookies became something we could make together without stress, without the need for precision equipment or years of experience, just patience and attention to how things felt under our hands.
Why Green Gel Coloring Changes Everything
The difference between gel and liquid food coloring haunted me until I finally understood it: liquid coloring is mostly water, which mixes into dough and creates that pale, washed-out green you see in grocery store cookies, while gel coloring is pigment-concentrated and vibrant. Once I switched to gel, my green was instantly jewel-toned and stayed that way through baking, which sounds small but honestly made these cookies feel premium instead of mediocre.
The Frosting-to-Cookie Ratio That Works
Too little frosting and these feel dry; too much and they become messy to eat and the cookies get soft from moisture. The generous layer I mentioned is about the thickness of a pencil—enough to taste it and feel it, but not so much that it squishes out when you bite down or turns the cookie into a frosting delivery vehicle.
Storage and Variations That Matter
An airtight container at room temperature keeps these perfect for up to three days, though they start disappearing much faster than that in my house. The flavor actually develops slightly overnight as the almond and vanilla extracts settle in, so if you have the patience to wait, day two is when these taste best.
- Try adding a few drops of peppermint extract to the dough for something that tastes like a holiday without being obvious about it.
- White sparkling sugar on the edges creates a beautiful contrast if you want less intense green or a different aesthetic entirely.
- Store frosting separately if you're making these ahead, and assemble just before serving or gifting for cookies that feel fresh and taste recent.
 Save
Save These cookies have become my go-to when I want to make something festive that doesn't require a baking degree or hours of fussy decoration. They're proof that simple ingredients and a bit of intention create something people remember and ask for again.
Your Questions Answered
- → What gives the cookies their vibrant green color?
Gel food coloring is used to achieve a bright, vibrant green without thinning the dough, ensuring a perfect texture.
- → Can I add a different extract for extra flavor?
Yes, a few drops of peppermint extract can be added alongside vanilla for a festive twist that complements the sweetness.
- → How should I store the finished cookies?
Store them in an airtight container at room temperature for up to three days to maintain freshness and softness.
- → What is the best way to coat the cookies with sparkling sugar?
Before baking, roll dough balls in green sparkling sugar to create a sparkling exterior that adds texture and visual appeal.
- → How do I assemble the sandwich cookies evenly?
Spread or pipe a generous layer of vanilla frosting onto the flat side of half the cookies, then gently press the remaining cookies on top.